There are often situations when an employee goes on sick leave due to illness. In this case, the employer must pay the appropriate benefit that is due to the subordinate due to temporary disability. Funds are paid to the employee only after sick leave is provided. According to the rules, the organization pays for the first three days of sick leave, but the rest of the payments are accrued from the Social Insurance Fund. Below in the article you can find detailed instructions with which you can create a sick leave certificate in 1C Accounting 8.3.
Preliminary program setup
This functionality is available only after making certain settings for your program.
Go to the "Administration" section and select "Accounting Settings".
In the window that opens, follow the “Salary Settings” hyperlink.
Our team provides consulting, configuration and implementation services for 1C. You can contact us by phone +7 499 350 29 00 . Services and prices can be seen at the link. We will be happy to help you!
A setup form will appear in front of you. Go to the “Payroll calculation” section and check the appropriate box, as shown in the figure below. Please note that this functionality is only available if the program does not include organizations with more than 60 employees.
How does the ELN processing system work?
The introduction of electronic sick leave is regulated by clause 5 of Art. 13 of Federal Law No. 255-FZ, on the basis of which ELN acquired legal force. The digital form of the document provides many advantages, including automation of calculations, data transparency and round-the-clock availability to all persons involved in the processing of sick leave.
However, the choice of the form of sick leave is assigned to employees of organizations - without their written consent, filled out according to a standard form in each medical institution where illness support is planned, the transition to ESL is impossible. This norm is enshrined in Letter No. 02-09-11/22-05-13462 of the Federal Tax Service of the Russian Federation dated August 11, 2017. The employer is obliged to provide explanations to its employees about aspects of working with electronic safety nets.
The interaction of the Social Insurance Fund, insurance companies, medical institutions and government agencies (in relation to ITU) is regulated by Government Decree No. 1567 of December 16, 2017. The listed interested parties in the information process install digital signatures, register in personal accounts on the website of the Social Insurance Fund, government services, install 1C-Reporting, set up certificates, and prepare software products in the workplace.
If the policyholder does not have an electronic digital signature, and the number of employees does not exceed 25 people, and the employees have expressed a desire to receive sick leave certificates electronically, the policyholder has two options for receiving electronic digital signature:
- The employee registers on the government services portal and in the personal account of the recipient of social services of the Social Insurance Fund. Next, the employee logs into his personal account, finds the required ELN, prints it out and provides it to the employer. The document is processed by an accountant, documentation is generated, with which the employee comes to the Social Insurance Fund office at the place of registration.
- If the employee has not registered on the specified resources, then the employer receives from the employee a stub of an electronic sick leave certificate issued by a medical institution, which confirms the fact that the certificate of incapacity for work has been issued in electronic form. After that, he creates a package of documents and sends the employee to the Fund to get a printed E-LN. In it, the policyholder enters the necessary details for the calculation and after checking them by an employee of the Social Insurance Fund, a register for benefits is formed.
Registration and calculation of sick leave
Sick leave sheets are located in the “Salaries and Personnel” - “All Accruals” section.
In the list of documents that opens, click on the “Create” button. You will see a menu with a choice of document type. In our case, this is “Sick Leave”.
In the form of the newly created document that opens, indicate the month, organization and the employee whose sick leave you want to reflect in the program.
Basic data
The “Main” tab indicates the number of the sick leave and whether it is a continuation of another. The cause of disability is selected from the default list. This could be illness or injury, quarantine, parental leave, etc.
Below, indicate for what period the employee is exempt from work in accordance with the sick leave. The default payment percentage is set at 60%, but depending on the employee’s length of service, you can of course change it.
At the very bottom of the form, on the “Main” tab, accruals and personal income tax are automatically calculated. The accrual is automatically divided into that paid by the employer and the Social Insurance Fund. You can only adjust personal income tax and average earnings data by clicking on the pencil sign.
We will not consider personal income tax adjustments in detail, since everything is already intuitive there. Let's focus on average earnings. Click on the pencil sign.
You will see Form 1C 8.3 with a detailed monthly calculation of the average earnings of employees.
Here you can adjust the data that affects your average earnings. This is done in the case when an employee recently came to work at your company, and there is no data on his earnings from his previous place of work. Or the program did not previously accrue payroll.
There are also very frequent cases where it is necessary to change the billing period. For example, an employee has returned from maternity leave; therefore, she may not have accruals for the time worked, as well as the time worked itself. In this case, when calculating sick leave, she can change the years for calculating average earnings to those when she actually worked (before maternity leave).
Additional data
Go to the “Advanced” tab. In our case, all data was filled in automatically.
In the benefit limitation field, the value “Limit value of the base for calculating insurance premiums” is automatically inserted. You can change this limit to the minimum wage, or to the minimum monthly insurance payment.
Part-time rates and benefits are listed below. The list of available benefits is shown in the figure below.
Accruals
In our case, on the “Accruals” tab, two lines appeared: “Sick leave at the expense of the employer” and “Sick leave”. The fact is that in our case, the employee is entitled to payment of benefits for 8 days. The first three days are paid by the employer, and the subsequent days by the Social Insurance Fund. If the period were no more than three days, then this tab would only have a line with the amount of sick leave at the expense of the employer.
In the tabular part of the accruals, you can only change the benefit amounts. On the “Main” tab, all changes you make will be reflected and the amounts will be recalculated automatically.
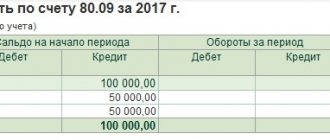
Postings on sick leave
Post the document and open its transactions. As we see, the amount of benefits, which is paid at our expense, is related to wages (Dt26). The part of the benefit that is paid at the expense of the Social Insurance Fund is taken into account on Dt 69.01.
See also video instructions:
Volume of compensation
According to the law, the amount of payment for sick leave compensation directly depends on the length of insurance:
- eight years of experience - the amount of the benefit is the full amount of average earnings;
- experience from five to eight years – 80%;
- up to five years of experience – 60%.
To reliably calculate the average salary, it is necessary to indicate documents confirming work experience in previous jobs (button “ Change data for calculating average earnings
").
This option is available only if you activate the accounting of the income of past policyholders. The length of service obtained as a result of calculations is entered into the “ According to work book
” detail on the date of payment.
If the accountable person has periods without insurance, these periods of time are deleted from the total insurance period. This feature is enabled by setting the details “ Required to enter length of service, taking into account non-insurance periods
"
Next, you need to indicate the length of service minus these periods and write it down in the “ Calculated according to the work book
” detail.
In the " Payment"
» the percentage of payment is set, automatically calculated in accordance with the law based on length of service.
In the example considered, the reporting person’s experience was 10 years, which means the amount of the benefit paid is 100% of the average salary. To review the calculation, you can go to the “ Accrued
” tab or print “
Calculation of average earnings
”.
When considering the average earnings of Ivanov V.A. for 2014 amounted to 600,000 rubles, and for 2015 – 670,000 rubles. Since the average earnings for 2015 are above the maximum accrual amount, it is necessary to take into account earnings within the limits of the taxable amounts:
(600,000 rub. + 670,000 rub.) / 730 days = 1,739.73 rub.
The amount to be paid will be RUB 5,219.19. at the expense of the employer.
Accrual of sick leave in 1C 8.3
When auto-filling the “Payroll” document in 1C 8.3 for the period in which our employee was on sick leave, the program will insert this amount into the appropriate column. Also, the amount of time worked will decrease during the period of illness.
On the payslip, accrued sick leave amounts at the expense of the employer are displayed on separate lines.
Adjustment of the sick leave period in 1C ZUP
It is possible that a document was entered into 1C ZUP 8.3 untimely or erroneously. There is a need for adjustments.
If an error is found during a period when the month is not yet closed, then you can simply make the necessary changes to it, recalculate and re-post.
If the month in which the document was created is already closed, you cannot simply adjust the document, as this will lead to a discrepancy between the accrual and payment amounts. In this case, there is a “Correct” link at the bottom of the document. Clicking on this link leads to the creation of a new document, which records corrections in the current (unclosed) period, and the original document is reversed.
If you need to completely cancel all movements of the closed period and transfer them to the next month, there is a “Reverse” link. Clicking on it leads to the creation of the “Reversal of Accruals” document.